Monday 20 December 2010

Happy Xmas and a very creative New Year

First of all I would like to thank you all for your support and friendship during the year, thanks for dropping by, and I wish you all a Very Happy Christmas and a happy, healthy and creative New Year.
Above is a photo I took of some dried holly leaves from my garden and some red berries. I put them on the top of my washing machine (white background) then played with layers in Photoshop Elements. Still not very good at the words (couldn't get them to move over - so gave up!!) but still very pleased with the result.

This photo I took this morning of the tree I was intending bringing inside to decorate. I have bought a load of new white decorations to go on it, but waking up to this tree covered in snow, I thought to myself can I do better than Mother Nature. I have 'softened' it with a few layers, but it still looks very pretty. If it all melts by Friday I will put all the new decorations on it! If not, I will leave it where it is .....

Just thought you might like to see the Wonderland that is my back garden at the moment, untouched by Photoshop.

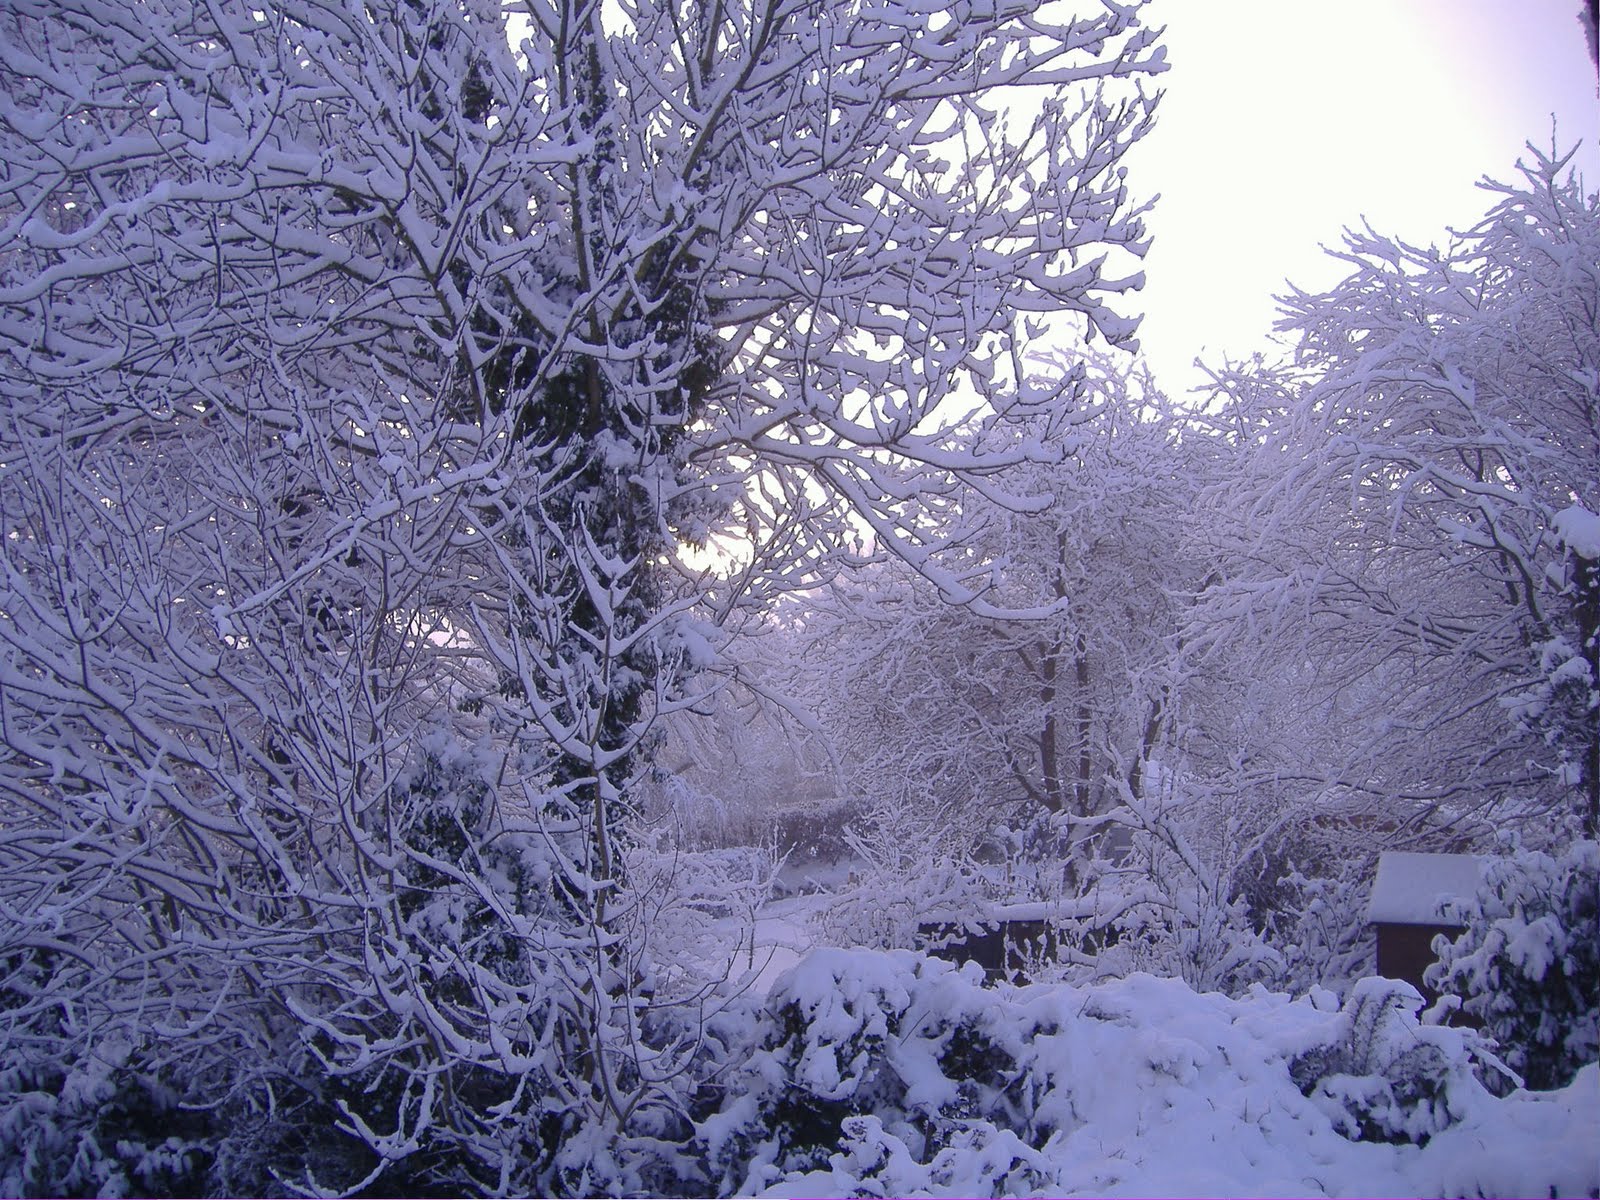
The trees covered in snow just take your breath away ......


What wonders we behold when the sun comes out - sunshine and shade!
Have a wonderful Christmas - I'll be back, hopefully, in the New Year.
Till then .......

Tuesday 30 November 2010

Brrrr........

We haven't had much snow at all, just what came last Friday, but same as everywhere, it is jolly cold, and what snow is left is truly frosted.
This is a view of part of my back garden, obviously taken from the patio ...

and this is it given a few layers of textures etc. What about that signature then - I've managed to make a new brush/stamp of my own signature!!!

To warm things up a bit, this is a view up the lane from my front porch, of a sunset earlier in the year .......


considerably warmed up with lots of red and yellow layers - over the top a bit I think? Ne'er mind, it looks a lot warmer in this pic than it does from my front door at the moment, I can tell you. You can see a name brush I made here as well, but that was using a font. The one above is the one I will stick with because I actually wrote it. I just need to remember how I change the colour of it now - black doesn't always show up!
Bye for now .......


Friday 26 November 2010

A bit of 'nostalgia' .......


I know this isn't very nostalgic, I took this photo in my dining room this morning, BUT if you think old oak instead of G Plan and peely walls instead of the wallpaper, and an old cottage somewhere, a 100 years ago ...........
what do you think? As you can see, I am enjoying playing in Photoshop Elements and actually looking forward to the winter, so I can spend all the time I want on the computer, with a completely clear conscience!
It has started snowing here this afternoon, and they promise the cold snap will last at least a couple of weeks. Hopefully not sounding too selfish, I hope they are right - I shan't have to move from this spot....
This is the view from my studio window overlooking the field next door. I took it early one morning when the low early sun was on the trees. I just used one layer of texture which was a scan of a kitchen paper I had used to mop up red and yellow paint - Constable eat your heart out!!!
Be back soon ......


Saturday 20 November 2010

Having fun in Photoshop Elements

Back in June, this delightful creature decided to pay our garden a visit, and stayed for a couple of months. He got quite used to us popping in and out, and we became very friendly, that was until he ate all the tops off my rudbekia plants!! Anyway, I reckon there's enough for everyone in my garden .....
I thought I would play with the photo, and started off by making it black and white and gradually adding back some colour ........ After layer upon layer upon layer, I have finished up with this.


I am quite pleased with the result - looks like a painting, which was what I was trying to achieve. I even managed to put back the light in his eye and paint in his foot, which got lost somewhere along the line! I've just noticed his foot is the wrong shape - Ah well! Back to the drawing board!

Tuesday 16 November 2010

Following on from yesterday ....

Just thought I would show you this. It is a picture of an orchid that is flowering indoors and sits by my front door. I used it to play in PhotoShop Elements last week at the beginning of the free Online Course with Kim Klassen. Following instructions, I cropped it, then put the word in and coloured the word. I then saved it (as instructed) as a Photoshop Elements File. This morning I went back to it and put more layers of texture over it, having had more tuition from Kim. I'm thrilled to bits and feel I am now getting somewhere ......
Where I started ........

Now I'm done (I think!) .....
I'm off to do my Homework for today - watch this space!
Don't forget, if you want to take Kim's free PSE Tuition click on the button on the right and register.
Be back soon ......

Monday 15 November 2010

An interesting Summer

During the summer months I took a couple of online classes, and met some very creative and talented ladies. It really is amazing how new horizons open up! During one such class on Shabby Chic Journalling (see my blog post of July 11th) I met Linda Vincent, who not only does fabulous journalling, but is also an amazing digital artist. Of course, I wanted to have a go, and Linda introduced me to a FREE course coming up and run by Kim Klassen on Photoshop Elements. This started last Monday the 8th November and continues until the coming Friday.
I've been playing like crazy until my brain hurts, but I think I am getting there, albeit slowly!
Anyway, I thought I would blog my first effort I am reasonably pleased with, although I appreciate I have a heluva lot to learn ........
This is a picture of the view I have across the lane from where I live...
BEFORE ............ and AFTER


Hopefully, I will learn during the week how to erase the telegraph lines!!
If you would like to register for Kim's class the next time she does it, go to the button on the right. Do visit Linda Vincent's blog - you won't be sorry. You can click on her link from the list of the places I like to visit, also on the right.
Bye for now .....

Tuesday 10 August 2010

July Swaps .....

Well, I'm just not very good at this .........
as this lovely Zentangle should have been at the bottom of this post! However, here will be just fine. Lise Pederson from Alberta, Canada tells me she has just started drawing these, so thought she would make a card and send it with my swap, which is below. Not bad for a beginner!! (I really am kidding, honest)
Now this little beauty is an ATC and was sent to me by Margeeth in the Netherlands.
Margeeth says it is Evolon, a non woven fabric, and she used transfer dyes to create the colours.
She also says Sifra's cat hairs are an additional embellishment that shouldn't really be there!


This is the ATC I sent to Margeeth to complete the swap. It is made from hand dyed silk rovings with black chiffon over, then stitched around and about, a lot!

I did another swap with Suztats (she of the gorgeous tatting). What about this Seahorse then - isn't she just lovely.

This is what I swapped with Suz which I called Neptune's Daughter! She is worked on dyed velvet and her hair is dyed scrim!


Now, Unlimited Textiles swap for July was a 7" Quiltie 'Carnivals Festivals and Events' and this Carnival Mask I made for June, who I must say was delighted.

This wonderful Quiltie I received today from Lise Pederson who lives in Medicine Hat, Alberta Canada (who sent me the delightful Zentangle card at the beginning of this post) In it Lise writes:
'For my July Block I chose to do a crazy quilt block to represent our celebration of "The Stampede" which is the last week of July. The rider on the horse represents the events that go on, such as calf roping, bull riding etc. The picture of the Indian Chief represents the name of our City "Medicine Hat". The legend is that a Medicine Man lost his headdress near the shores of our river "The South Saskatchewan River", and so hence the name chosen for this City. The yellow and orange flowers are wild flowers that grow in the prairies and the wild roses are the flowers that represent our Province "Alberta". The pines are for the hills of Elkwater Lake which is about a half hour from our city. Hope you like it. It was fun making this.'
Nah! I don't like it - I absolutely LOVE it! If you enlarge the picture you will notice a tiny charm of a horseshoe and riding crop on the bottom left of the rider picture, an Indian spearhead to the left of the medicine man, a howling coyote (I think!) just under that in the middle of the quiltie, and over to the left just above the ribbon roses a tiny Alberta badge. Oh yes, and there is a Canadian Flag (badge) flying among the pine trees! The hand embroidery of wild flowers etc. is just amazing, and the beading is beautiful. I'm a very happy bunny!
Hope you enjoy looking at it as much as I do.......
Till next time .....


Wednesday 28 July 2010

Kate North's Little Quilt Swap

The fourth Little Quilt Swap that Kate North runs has just completed. It was the first time I had anticipated, and I was absolutely delighted with my swap.
This little quilt 'Cornflowers' was my contribution - made with my own hand dyed fabrics and just one commercial one(dark green). I fused the cornflower petals onto the pieces background, and machine quilted it. I sent it to Margeeth in The Netherlands, and her blog can be seen here.
This little quilt was made by Andrea who lives in Flintshire, and is machine appliqued with the finest buttonhole stitch, and hand quilted in the centre with machine quilting in the border. I just love trees and this one is absolutely delightful. Andrea's blog can be reached here.
If you would like to take part in Kate's next Little Quilt Swap you can find her here.
Till next time .........

Tuesday 13 July 2010

Swaps for June ...

This ATC is called 'Pink Wisteria' and was made for me by a very talented lady in Ontario called Susan Cuss. Her blogging name is Suztats (cos she does tatting I assume!) and she can be found here. The pic is slightly bigger that real life, so you can imagine the intricate detail - Suz says it was worked with size 40 Yarnplayer's hand-dyed thread in the colour 'peace'. Thanks again Suz - I love it.


This ATC was made for me by me friend Alis - who can be found here. We made dolls together recently, with fabric we had constructed, and this is a piece oeft over from Alis' doll. She calls it Devon Violets - which I think is extremely appropriate. Thankyou again Alis - it is just beautiful.


This one was made for me by Sandy as part of the swap we had at Unlimited Textiles last month using the theme Orange, Purple and any other colour ......


this one was made by Alis.........


and these are the two I made for Sandy and Alis, adding pink!


The Quiltie exchange for June was Here comes Summer, and this gorgeous Sunflower was a gift from Pam in Port Talbot, Wales. The petals are one piece of fabric, but the way she has stitched it, it really looks as if each one is appliqued.


and this is the Quiltie I made for June in Coventry.
I really must get cracking on the Unlimited Textile swap for July
Till next time then ..........

Sunday 11 July 2010

The Garden Journal is finished!

This is the Front Cover ....................
this is the inside of the front cover...........

and this is the inside of the back cover - there is nothing on the outside Back Cover - just fabric!
I've really enjoyed this online Workshop with Carole in New Zealand.
She mentioned doing another Journal Workshop soon - if you are interested pay her a visit, you won't be sorry.

Saturday 3 July 2010

Garden Journal

I am enjoying a brilliant Journal Workshop online with Carol in New Zealand, whose Blog can be found here. Carol has encouraged us from the start to leave threads hanging, and stitch using free machine stitching and black thread! This I find very difficult - not that I am a tidy person naturally, heaven forbid! I am making this Garden Journal as a raffle prize, so there is my dilemma! I need to use matching threads, as I don't know who or what the person will be like, who will ultimately own it (well that's my excuse anyway!). So .......

Here are the three signatures with pages inside - showing various lacy (ragged) edges. All the signatures are watercolour paper painted using teabags......


Here is the front of the first signature (introducing the viewer to the Journal) ...

lots of empty pages to be written on - notes to be made .........


Front page of the second signature .......


turned, to reveal a pocket (for seeds or dried flowers?) ........

more empty pages, decorated with laces, etc. .....


a reminder to make a daisy chain .........

and chase butterflies ........ it says 'chase butterflies' on the reverse of this decorated insert.


Another pocket for pressed flowers? .......


and finally the back page of the third signature.
I will probably embellish one or two of the pages, once I know how to stitch the pages together, and have made the front and back covers and embellished those inside and out. As it is a gift for a stranger, I don't want to go 'over the top'!
I have a smaller one ready to embellish FOR ME! This one I will use black thread on cream lace etc. and try harder to go 'scruffy and ragged'!

Tuesday 15 June 2010

Nearly there .......

For the last couple of months (yes I know, I know, but I need a lot of thinking time) I have been busy creating some fantasy trees, which are heavily influenced by the brilliant work of Kay Nielsen, who was born in Denmark in 1886 and died in 1957. He illustrated childrens books and my piece is from an illustration of his from the book Twelve Dancing Princesses. Obviously I haven't put twelve dancing princesses in mine!
I started off dyeing several pieces of cotton in jam jars, for the background. I love the way the colours merge and create 'magic' on the cloth. Then, using kozo, I stitched down loads of skinny tree trunks, and embellished a couple of tree tops using lilac and green sheer organzas. The tree on the right (over the organza) is 3 sections of 'peeled' silk hankie, the tree in the middle is lutradur, cut into pieces with a soldering iron and painted several times, and the tree on the lower left hand side is lace, with the top covered with shaped raw silk throwsters waste. The trunks near this are paper string, topped with felted wool shapes. Not a lot has happened here, except that a lot is stitched down and there are refelted tree tops on the top left hand side and a tree top on the top right hand side made from raw throwsters waste but with the gum still in, so all I did was spray some with water, shape it and press it dry (just like making silk paper from gummed cocoon strippings)


I'm getting there now, and this shows where I am at the moment, together with my working drawing. I am pleased to see/say that as I have progressed, the piece gets less and less like the original drawing. There is actually some hand stitching (single lazy daisy stitch worked in silk thread) in the tree tops on the top left hand side. I will be hand stitching the tree top on the right hand side too, with seeding stitch.


I've been playing around with the forest floor, with some various paints and deciding if I will put a 'point of interest' in somewhere - to replace the twelve dancing princesses I guess!
Anyway, I painted and cut out this little deer from some lutradur, which I reckon I will use, and also tried out some 'rocks/stones' from some silk paper (cocoon strippings). I decided I don't like the paint much - doesn't really go. Just as well I tried it on a bit of scrap fabric!


I'm still thinking, but I rather like the way the little deer wraps around the tree trunk, which is made from peeled layers of silk rod, as are the whispy bits of 'grass'. It is only pinned at the moment, but unless I come up with any other ideas, I shall be stitching the whispy bits down and adding some stones here and there, and I guess it will then be finished. Oh - I shall add a couple or so painted stars in the sky for good measure! It measures 20" x 30".
I'm now thinking about the next piece ........ so until next time (another couple of months no doubt!)